This is not a post that replaces or upgrades any information published elsewhere … it just clarifies in my mind what I should do when I setup a Publish service in Lightroom, or Export from Lightroom with the intention of using an image on another service. Just to be clear, there is no right solution, just a number of things you need to bear in mind. What are these?
Well to start with, the output medium or device, is critical as it will affect the sizing decision of the image you make prior to publishing, or export.
There is the format of the image which is related to the above – it might be TIFF if the image is to be printed, otherwise it is likely to be PNG (from Lr Classic 8.4, August 2019), or more likely JPEG.
Then there is the compression, or quality, you decide to accept if you’re converting from RAW to JPEG. This won’t be an issue if you’re already working with a native JPEG image, unless it’s produced a very large file size when you might consider some further compression, prior to the re-sizing I discuss below.
So … the output device. If it’s going to a print shop you’ll probably be selecting TIFF and will size the image as you require it – so I’ll ignore that except to say that you need to enquire what Resolution the print shop can accept – the file size will be large, depend on that! If it’s going to your printer then you’re going to print to the maximum size that your printer will allow and you should use the Print module in Lightroom, but making sure that you let the printer control the Colour Management. You might need to convert to JPEG to print to your printer, if there is no device driver for your printer in Lightroom and then you will have to Export first; but if you’re using the Print module in Lightroom, this will not be necessary.
If the export is to a display screen you need to know the dimensions that the screen will support. There is no sense in sizing an image larger than the device is capable of displaying as that will just produce an image file size larger than it needs to be. Likewise it’s debatable whether it’s desirable to enlarge an image to match the dimensions of the device as that will involve interpolation (inventing data) and the image quality will therefore drop – let the device do the re-sizing if necessary!
So the Lightroom settings for a 4K screen might be either of …
… or …
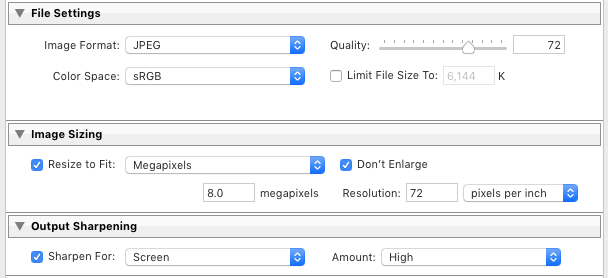
… of which I’d probably select the latter. Note the Resolution field. This is totally superfluous when exporting an image for a screen display, or indeed for the web. Note also the Sharpen options which you should choose appropriately. If you’ve sharpened in the Lightroom Develop module already, you might not want to further Sharpen here.
If you’re exporting to Flickr or Google Photos then you need to take note of the size that the service will accept. For Flickr each image will have to be less than 200Mb (or it will be compressed), but with a cap on file storage space of 1Tb and 1000 images in total it makes sense to use an Image Sizing long edge value of 1024px. For Flickr Pro users there is no limit, so you can size as you wish. If you’re using Google Photos then the “free” allowance limit is 16mp for each image, so it’s perhaps worth bearing this in mind and using an Image Sizing Megapixel size of 16mp.
If you’re Exporting (Publishing) to the web you need to consider the maximum size that you can “get away with”, because the smaller the image size, the faster it will load. Generally, I’d probably use a Long Edge Value of 1024px and Sharpen to a High level.
Now we come to the RAW to JPEG conversion, which like re-sizing of the image dimensions will also affect the file size of your image.
Lightroom fortunately provides only one parameter to consider here, after you’ve chosen the Colour Space which should normally be sRGB. This parameter is called Quality. It doesn’t call it “compression” because it is taken as read that JPEG is a lossy format, and that compression and loss of data will take place in the transformation. It is left to you to decide what level of Quality you can accept. To help you Jeffrey Friedl has written an excellent, one might even go so far as saying the definitive, article on the subject. So much so that I’m not going to even try and summarise it. But having read it – which you should, you might also choose to look at this one too.
From reading this and my own experiments, I’ve decided to adopt a Quality setting of 72 as my general purpose setting. It’s NOT a good idea to Limit the File Size here – instead look at re-sizing the image as previously described to reduce the file size, if necessary.
So to export to Dropbox for instance, to share images on a 4K screen, my settings would be …
And that’s it.


