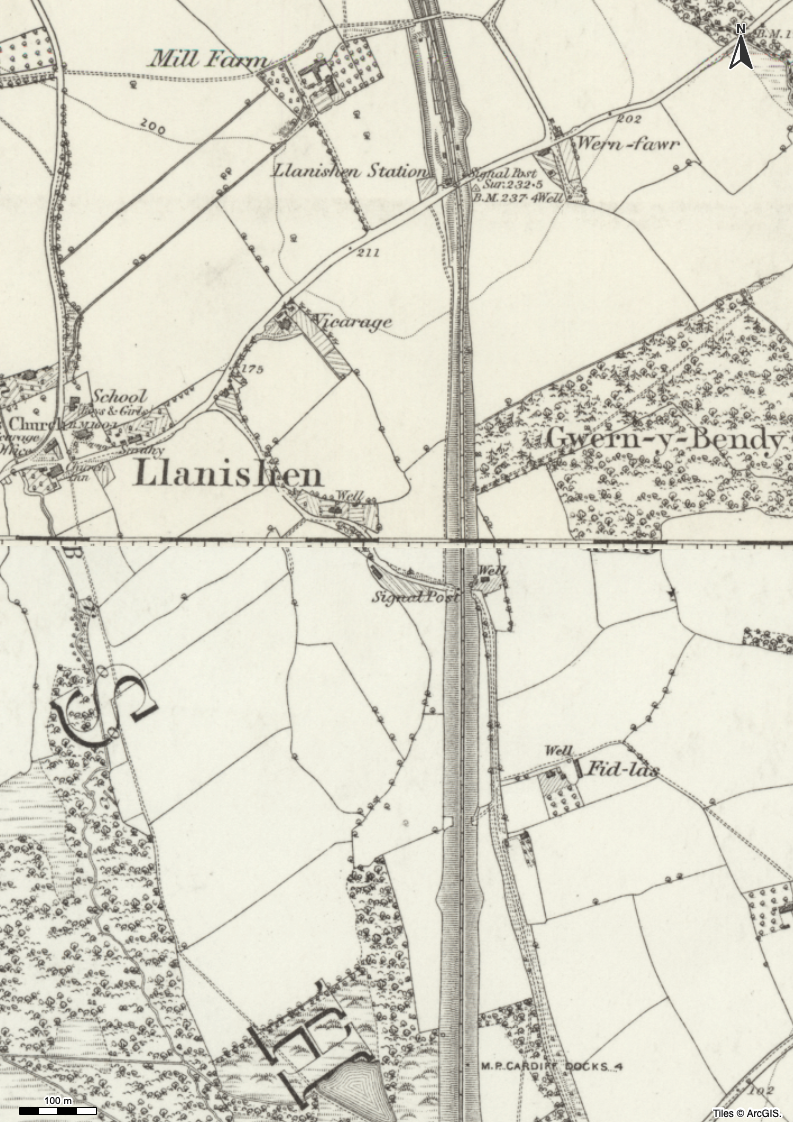
Recently, someone in the Cardiff u3a Lightroom Pantry group asked me this question …
Sorry to bother you, but I’m running out of hard drive space on my Mac, can I delete any of these files? I’m wondering about the previews file????
The first thing to say is that the user is storing images on an external hard disk, just the catalog and previews files etc. are on the internal hard disk. So this text from a post from a Lightroom Queen Forum is helpful …
Unless you have a laptop and or your images on an External drive, you don’t really need Smart Previews, standard Previews will grow unless you limit the number of 1:1 preview to 30 days. Deleting images does not immediately delete the previews though I think it will eventually.
If you upgrade to LrC v14.01, you also now have the option to limit the size of standard previews not exceed 100 or 150 GB or what number that you set. LrC will the delete previews beginning with the oldest and starting with the 1:1.
I have about 82,000 images in my master catalog and a standard preview size of 41GB. On import I generate minimal previews, no 1:1 and have 1:1 previews set to delete after 30 days. I have not (yet) set a limit on the size of my standard Previews.
So the user should use Smart Previews as they have an external hard disk holding their images.
They should also look at the Import parameters for Previews (in the top-hand corner of the screen) in the Import dialogue and choose Smart Previews. They should also NOT use 1:1 Previews as they take-up more room on their hard disk, and should choose Standard Previews. This is my setting box …
Finally, the user (and you maybe) should look at the Catalog Settings > Preview pane which might be a way of restricting the growth of the Preview file (as mentioned in the Lightroom Queen Forum) …
An important fact I forgot to mention (which again was mentioned in the LrQ Forum post) – you can delete the Preview file; it will just be recreated as needed (it takes a very short time to recreate a preview of an image). Limiting the size of it will certainly ensure that the disk space used will be less, and if they create 1:1 previews in the future, deleting them after 30 days (as I have it set) will ensure that disk space will be controlled too.
This link from Adobe explains Preview files.
Another member challenged me on why (see Import settings above), I chose to Make a Second Copy of images when I import. My response …
It’s a timing issue. I don’t keep SD cards with images on them – I know some of you do. I Format the cards in Camera (not on the computer) almost immediately after I’ve imported. [That stops the rather annoying feature of images you’ve previously deleted in LrC being suggested for Import when Import All is selected in the dialogue.] So … I need a belts and braces facility in place, just-in-case, my internal hard disk crashes before Time Machine has backed-up my current year images. So I do a Second Copy to my iCloud drive, which I delete periodically, usually at the same time as I delete old backups of catalogs which are also held on the iCloud drive.
Next we turn to the range of tasks that I do every year at this time – as the year ends and a new year begins.
The first thing to state (and a very obvious one at that) is Backup your Catalog, and then continue to Backup your Catalog as you try some of these ideas out. That will mean exiting Lightroom Classic and NOT skipping Backup. It’s better to be safe than sorry!!!
So what might you wish to do when Importing images into your catalog?
Two things really, first creating a “preset” for the Metadata that you’d like to import with every image which will then be baked into the EXIF data of the image. The second is the Preset itself which records the action that you wish to take on each Import eg where the images will be stored, in what form, renaming them, making a second-copy, profile changes, etc etc.
Let’s look at each in turn.
You want to add to the Metadata added to the image at the time of import, to add keywords, or to add a Copyright notice. This can be done from the Metadata pull-down menu in the right-hand Import panel …
… and here you have a whole range of options that you can choose from with perhaps the most relevant being the Copyright info. and any info about you you want added …
… so my Copyright info, and the only ones I use in the Metadata, and which I update each year before January 1st looks like this …
… and that’s about it. I enter MLT Copyright 2025 in the Metadata field in the right-hand pane and move to the next step – creating an Import Preset.
Click on the Import tab in the Library module; apart from deciding whether you want to …
… you will see at the bottom of the screen the word None …
… unfortunately, this will always be the case; it’s up to you to now create, and then choose the Import Preset you want to use. This has its advantages because you can change the one you want to use by year, by camera, by anything.
So, you set up the parameters from the right-hand pane the way you want them and then click on None and …
… Save Current Settings as a New Preset, and you’ll be asked to give it a name, and that’s it. Every time you want to apply these parameters to an Import, that’s what will happen. The files may be renamed (if that’s your wish), they will be copied to a specific folder on your hard disk, etc etc.
Other tasks to do at year end.
- Search for missing files (these will be photos in the catalog, but not in folders -they’ve probably moved!)
- Searching for duplicates – The Lightroom Queen has an excellent post on this topic which I can’t improve upon and recommends a plugin (which I have used) which in the case of simple duplicates works well.
- For more complicated duplicate problems – perhaps involving whole folders of potential duplicates, its probably far better to use an operating system program such as dupeGuru (MacOS and Windows) or Photosweeper (MacOS) – there are others for Windows that I haven’t tried. I’ve tried both but prefer dupeGuru as it allows you to do a quick sweep by EXIF data, and Content of Pictures specifically.
- One suggestion I have is to separate folders into catalogs and Export as Catalog before doing any scans for duplicates. When you have a folder that you think is clear of duplicates chose Import as Catalog from the Library > File menu, and when this has been achieved, delete the original folder.
- This links to another feature that I rally hadn’t appreciated until I read this article. Rather than doing move of files/folders INSIDE Lightroom (which is the accepted wisdom to maintain the integrity of the catalog) – which can take a really long time and which is also potentially dangerous in terms of file corruption, use Find missing folder. You chose the old folder in the Library and then point (by right-clicking) to the new folder you’ve just imported.
Backup
All of the above was a preface to doing the real annual task which is creating an offsite backup which up until this year was copying all the images and the catalogs onto a hard disk that I stored in my son’s house nearby. This was the safe/secure disaster recovery option which meant that all my historic images would be safe.
In doing this work, this year, I realised that I’d probably not been as clever as I could have been, and in copying images and catalog(s) separately, I’d been missing a trick. It became obvious to me (light-bulb moment) that I should Export as Catalog (Catalog + Images) to the Hard Disk. This then led to the realisation (second light-bulb moment) that I was keeping a large number of old catalogs, for previous versions of Lightroom that I would never go back to, because if I stopped my Photographic Plan subscription I would still have access to the Library module. Why would I want to go back to an earlier version!
I was on a roll now and looked at other people’s backup strategy. Yes, I was doing the right thing in having a 3-2-1 approach – three backups, two locations, one offsite, but was I really doing the most efficient and most effective form of backing-up. Perhaps (third light-bulb moment) it might be better to clone my Lightroom folder(s) overnight – so that I could quickly recover in the case of primary internal hard disk loss – instead of relying on rebuilding from Time Machine and iCloud Drive; and perhaps it might be better to look at Cloud storage for the offsite storage.
I’m moving closer to making a decision on this and if I do move in this direction I will probably use Carbon Copy Cloner (MacOS only) for cloning to a local hard disk, and Backblaze for offsite storage to the cloud, run overnight.
I’ll report on how I get on with this at a later date.