
Welcome & Boot-up
Introductions
What do you want / expect from the Group?
Please tick your attendance, pay £1.50 and agree that you want to join the “Thought grazing” website I run where the notes of the meeting are posted, and that you are interested in joining a WhatsApp Group.
For those who’ve expressed an interest in “Thought grazing” and establishing a WhatsApp Group, I’ll send out an email following the meeting with UserIds and Initial Passwords for new members. [You can change your password if you want to – I’ll write a post that explains how you can do that.] The Password for Password Protected pages on the website is the same as everyone’s initial UserId Password, namely – Ca3rdyddU3A
Does anyone have any difficulties in connecting to the Thought grazing website?
Does anyone want to join the WhatsApp Group but is unsure how to do it?
I think it best to gloss over the chaos that followed – we’ll get there; here’s how to add members to the Group so that I don’t forget … add member to Contacts on my phone, then I can see them in WhatsApp to add them as a member of the Group. Easy when you know how … duh!
Incidentally Paul has written a post detailing how you can add WhatsApp to a Tablet.
Do we all know the difference between Google and an Internet Browser? – Don’t be shy. This is perhaps the most important thing to be sure about before we go any further. Two links to look at – Just google it … and the notes from the first meeting last year.
What’s happening to Digital Projects? Well the first one has been announced, it’s a re-run of a Digital Photography course using Adobe Lightroom and it’s announced in the latest Newsletter on the new Cardiff U3A website.
Which brings me to our webpage on the new website, the Photography Group has already added information to their page.
- What do you think should be on it?
- Should we have a number of pages?
- Any ideas for an image to head the page?
Helping others in Cardiff U3A with Computing/IT issues …
- a WhatsApp Help & Advice Group? We agreed to do this and I’ll write to the Committee for them to consider.
- [Update: The committee is going to consider this at their meeting in October. Further update: We decided to withdraw our offer until we felt more confident in using a Group for ourselves!]]
- opening-up Thought grazing to non-Group members? We agreed not to do this
Visits. We agreed visits to the Barclays ‘Maker Space’ which Mario will arrange for us, see details below …
In addition, as part of our community commitment, we have also opened a new office in Cardiff designed to help businesses grow and start up in Cardiff. Great for budding Entrepreneurs (which statistics show can be high in the over 50s) and inventors. Part of the Eagle Lab office hosts a “Maker Space” that houses laser cutting, vinyl printing, 3D printing, electronics equipment including soldering etc. It has a distinctly digital feel too with a really switched on Engineer running the lab. We can host groups there and would be happy to chat with your Digital Projects group and your Science groups coordinators, to discuss with them what is available there and whether they would like to bring members along to take a look at the facilities, or host a meeting there. Please feel free to ask them to contact me and I can discuss what they need, what we have, what we can do to support your members.
… in the approach to Easter, and also a visit to the new BBC Centre after Easter.
I’ll approach Cardiff Uni about the possibility of a visit maybe before Christmas, and Fred suggested a visit to Brains new brewery site as an alternative.
[Update: Unfortunately I was unsuccessful in getting a useful visit to the Computer Centre of Cardiff University; I have another idea, but Fred has offered to contact Brains and their new brewery at Cardiff Gate for a visit before Christmas.]
Finally, I posted an article about the forthcoming MacOS Upgrade to Catalina – which is a 64-bit operating system – and what it might mean for Mac desktop/laptop users. This has prompted me to consider this as a topic (not Mac specific) for later in this meeting. There are several links in that article that you may wish to follow, and which are not listed below, if you’re a Mac user.
Other issues raised:
Gill asked whether it was possible to print from an iPhone to a printer. Members were able to say … yes, if the printer supports AirPrint. I presume there’s an Android equivalent?
Renee asked about opening compressed files in emails on an iPhone. We got some way to solving that one, but agreed to take it onboard as a conversation on the WhatsApp Group.
If I’ve forgotten anything, please let me know.
Gear Guide
Has anyone bought, or obtained anything recently they’d like to tell us about? It doesn’t have to be a computer, laptop, tablet or phone – just something that’s digital, ie used a computer processor in some way?
Apps Galore
That slot in the meeting where members are encouraged to share their experience (and possibly excitement) at a new app they’ve started using for their smartphone, tablet, laptop or desktop machine.
Renee mentioned that she’d found DuoLingua a very interesting application for helping her learn a language just recently – others had used it as well.
What’s IT all about?
The next upgrade to MacOS – Apple’s operating system for its desktops and laptops (not iPads and iPhones) is 64-bit. Any software that is not compliant, that is it’s not written to meet the specification of 64-bit, will not run on your machine once the operating system has been upgraded. What does this mean though? Do Windows users face a similar issue, now or in the future?
I’m going to use this article as the basis for the explanation, using Windows as the operating system in question. But first, does everyone know what an Operating System is?
It has to be said upfront that Microsoft has been extremely “kind” to its users, offering backward compatibility even back to MS-DOS (a 16-bit operating system) for a long time so that you can even now still run old DOS programs using a 16-bit emulator for Windows 10. However, Microsoft has also confused its users ever since Windows XP by providing two versions of its operating system, one for 32-bit and one for 64-bit. If you had a previous version of Windows – XP, 7, or 8 – which had the 32-bit operating system installed on your machine, you are more than likely to have got the 32-bit version of Windows 10 installed on it when you did the free upgrade. But you can upgrade to the 64-bit version if your hardware will allow it. And there’s the rub, not all hardware will allow 64-bit processing and that’s why the MacOS upgrade is both helpful and annoying.
It’s helpful in that it sets a new benchmark for all software developers. They’ve known since December 2018 that this change was coming, and it’s not particularly challenging for Mac users as machines back to 2012 (including therefore my MacBook Pro) will be able to make the switch.
But why the change? Well as the first article spells out the biggest advantage of using a 64-bit processor is that it can address a much larger amount of RAM (Random Access Memory) and so therefore machines with more than 4Gb of RAM will benefit from faster processing if the applications are written to the 64-bit code base. Also more programs will be able to held in RAM, enabling faster switching between applications. Graphics intensive applications with the dependance on a large amount of memory space will also work faster. So there are huge benefits.
So should you as a Windows user upgrade to 64-bit Windows 10? That depends upon what you use your computer for. If you decide to stick with 32-bit be aware that Microsoft will one day dump 32-bit in the same way they “dumped” DOS, but the community of users is so massive that undoubtedly a 32-bit emulator will be written, by someone! But, you may choose to make the switch, if your hardware can take it, before you’re forced to jump; and in the meantime be aware that you’ll undoubtedly and progressively experience a slowing down of your software as more of them become 64-bit, and if you try and run a large number of them concurrently (at the same time) in different windows.
Some more links for you to ponder …
How to switch from 32-bit to 64-bit Windows 10
FAQs from Microsoft on 32-bit and 64-bit computing
32-bit app compatibility for Macs with current Mojave operating system
Incidentally, my MacBook Pro is still running High Sierra, the operating system before the latest one – Mojave. I intend to upgrade it to Mojave and then leave it at that operating system so that I can run some 32-bit applications such as Office 2011 and Adobe Lightroom 6 (and earlier) for a while longer. It is a seven-year old machine … it’s doing very well with the upgrades it’s had to it’s hardware – solid state disk, RAM increased, replacement battery – it’s not ready for the scrapyard yet, and it’ll be more difficult to upgrade to Mojave soon, once Catalina has been released.
My machine’s running slow!
Quite co-incidentally I’ve been approached by a U3A Group Facilitator who’s having problems with the performance of their machine.
This led me to do a search of Google for good articles that might be of help and value. We’ve looked at this before, of course for Windows, and I’m adding a couple of links below which might be of interest and assistance.
I use MacPaw‘s CleanMyMac 3 on my MacBook Pro, and I will probably upgrade to CleanMyMac X for both desktop and laptop before I do any upgrades to Catalina. Here’s a blogpost on how you can improve performance on your Mac.
Here’s an article that makes suggestions on how to clean-up both PCs and Macs.
So … to the Windows PC. Here are a couple of links:
Some quick ways of speeding-up Windows 7, 8 and 10 PCs.
Tips to improve performance with a Windows 10 PC – from Microsoft
Set of links from an earlier Thought grazing post on Windows 10 maintenance
Easy-peasy photo-editing … believe me!
You’ve taken a photo, or been sent it in an email, but you just feel that you could make it just a little bit better. Don’t despair, there’s an easy way of editing a digital photo in just a few steps if you have a Google Photos account, and if you don’t – here’s how to get one and how to get started with organising your photos.
Some thoughts. Most smartphones take images of 12mp or perhaps a little more. You can print a decent 15 x 10 inch picture from an image of that size
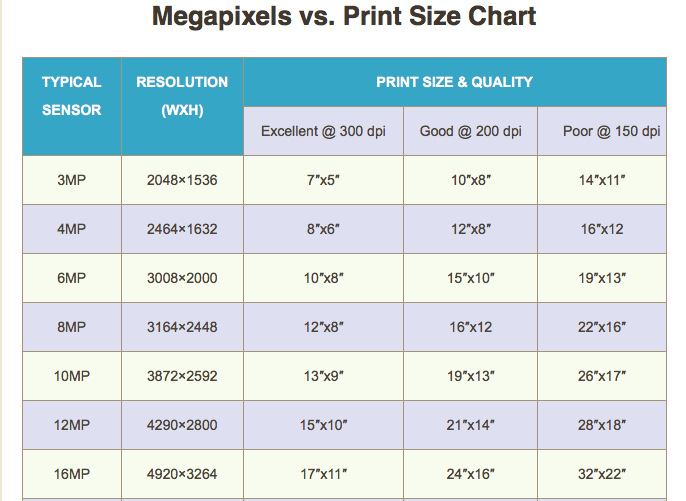
Google allows you to upload images without any compression up to 16mp – happy days!
So on to a demonstration … some simple edits to enhance an image.

For more guidance on Google Photos, the use of Backup and Sync and much more, you might like to visit (or re-visit) this Thought grazing page.
![The subject for today is … sharpening [Updated]](https://just-thoughts.com/wp-content/uploads/2019/08/ForestFarm-20190729-6515-7.jpg)


