Home networks – some notes

I’ve written and talked about this subject on a number of occasions. I’ll bring these together in one place, before delving into the specifics of router configuration which prompted the subject for the meeting on Feb 4th, 2021.

For many of us home networking means WiFi, and the first article I wrote was on the subject of “Flaky WiFi” on October 11th, 2016. Members of the group had commented on their WiFi connection appearing to drop and in this article I tried to explain how all the bits and pieces hung together and how you could test your network to see it was working the way your Internet Service Provider (ISP) was proclaiming it should be!

Then, later on (January 26th, 2017), we discussed “Broadband speeds, WiFi routers (their type and security), and extenders or boosters” and as the title suggests we focussed on networking in the house and how it is provided by Internet Service Providers, such as VirginMedia, BT, Sky or TalkTalk.

I described “How the Internet works” in this post on June 29th, 2017, with links to a few videos and policy documents which hopefully explain the topic better than I could. Not much has changed since then; IPv6 is still to appear in the domestic market, so we still use IPv4 for internet addressing.

Finally, on July 27th, 2020, I wrote about “Improving home network performance” which is really what I’m going to revisit in this post.

So … what do you need to take a look at?

On your router:

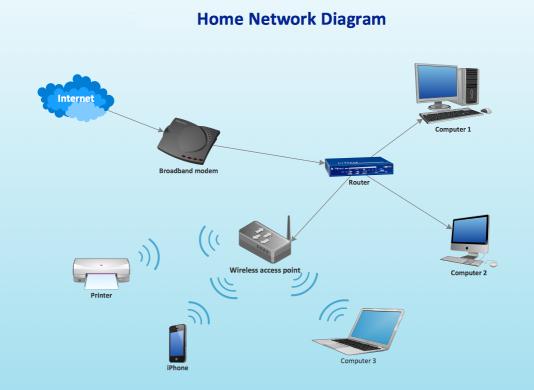
If you’re using an integrated modem/router – often called a hub, typing in the IP address 192.168.1.1 will bring up a screen something similar to this …

… mine is different because I’ve disabled the router functionality so that I can use my own router – a Netgear Orbi Mesh Network – so to just access the modem part of MY hub I use the IP address 192.168.100.1. You can see from the above that only the Modem is active.

So for most users with an integrated modem/router, the first thing you need to be able to do is to access your Router’s Admin Dashboard. This article explains how to do it using the cmd prompt in Windows, but it is probable that your hub/router has an application you can start to do this, or that you can access it from a browser window. For most you would just enter the IP address 192.168.1.1 and supply the UserID admin and the password that I’ve created – the default is quite commonly ‘password’, so you ought to change that!!!

The above screen is for my mesh network, but non-mesh would be similar. Clicking on Internet will give you the ability to change some of the settings for your connection.

Of these the most useful to change is the Domain Name Server (DNS) – these are the servers that translate a URL (eg just-thoughts.com/) into an IP address. I've chosen to replace the default DNS supplied for my VirginMedia (ie 194.168.4.100) Hub (I've disabled the router functionality on the SuperHub so that it only acts as a modem) for two servers run by Google (1.1.1.1 and 8.8.4.4). The reason I've done this is that these servers are replicated around the internet and will almost certainly be closer to my router than VirginMedia which I think the closest one is in Bristol.

All the other settings can probably be left as they are. The next option is where you configure the name of your network and the channels you’re going to use.

If you don’t like the name supplied to your network by your ISP, you can change the SSID. I did to make it a little more meaningful. You should then consider changing the 2.4Ghz Channel. If you can set the channel to Auto – you should do so because generally the router will then find the best channel for your network. If that’s not possible and you have found your WiFi to be “flaky” due to you and your neighbour using the same Channel(s), try setting the channel manually to one that’s not being used. The article I mentioned before describes how you can find the best Channels for a Mac, and this one identifies a Windows Tool that does the same thing – there’s a Download link at the bottom of that documentation. Here’s an article that describes all the possibilities.

Generally 2.4GHz has a wider range of signal but lesser bandwidth (throughput), and 5Ghz the opposite – shorter distance, but higher bandwidth. On my system my 2.4GHz channel gives me 400Mbps and the 5Ghz channel 866.7Mbps.

You’ll want to look at your Security Options and make sure that you choose the best for the devices that you’re going to connect to your router. Generally, for a home network, WPA2-PSK [AES] should be sufficient.

This article from the Apple website provides a very thorough and detailed examination of what settings you should deploy for your router, and why. Worth a read, even if you’re not an Apple Fanboy!

On your device …

Make sure the security settings match that you’ve just set on your router; remember the SSID and Password you’ve created, and re-connect to your network.

And that’s about it … I hope. Questions??

Flaky WiFi, or what? [Updated 4th Feb, 2021]

Have you ever experienced a dramatic fall in the internet performance of your computer, phone or tablet when your device is connected to the WiFi network in your house? You have? You may be suffering from “flaky wifi” – I hadn’t heard the term before, but it’s for real! Just Google it and you’ll see it does exist; but what is it, and how do you rectify the problem? It might be intermittent, or might be permanent. Can you solve the problem? Yes you can.

First some background information – you can skip this if you want.

Let’s look at how the broadband (the fibre-broadband-cabinternet) enters your house. If you’re lucky you will have a fibre-optic connection which would give you the fastest speed and performance but the fibre only runs from the Exchange to a Street cabinet. From the cabinet to your house the connection will be by copper. You can bt_-fttcrecognise whether you have fibre in your area by looking at the BT street cabinets. If they’re like the one on the left – you have. If they’re smaller like the one on the right of this picture and don’t have vents in them (necessary for cooling) – then you won’t … yet! Inside the cabinet it is still likely that there will be a tidy arrangement inside-cabof cables and patch leads – not at all like the old telephone street cabinets which usually are rather untidy. So the picture to the left is a couple of rather proud BT engineers looking at a new fibre cabinet. So whether you have copper or fibre to the cabinet, the connection to the broadband in your house will be by copper. This is the same for the cable operators like Virgin Media as well.

Your broadband provider (your Internet Service Provider, or ISP) will have given you a device that presents the internet into your house. This could be done in a number of ways, but for this discussion I will call the device a hub. The hub incorporates two components – a modem which pulls the signal from the street cabinet and pushes a signal back, which in turn is connected to a router which handles the distribution of the signal to your various devices in the house. Sometimes these are two separate devices, in the case we’re considering they are one and the same. Your router will probably itself have two components – an aerial for sending and receiving a WiFi signal and a number of ethernet ports to allow you to directly connect a device by an ethernet cable to the router.

homecomputernetwork_diagram[This is always faster and more reliable than using a WiFi connection – but more about that later.] In the diagram to the right the WiFi is being delivered from a separate Wireless Access Point. This is not the normal way of providing Home WiFi nowadays, but before the introduction of “the hub” – it was.


What’s this got to do with “flaky WiFi” I hear you say … we’re getting there, but if you want to fully understand how the internet works you would benefit from an explanation of another piece of wizardry – the Internet Protocol, or IP address. You can skip this bit too if you like.

Every device connected to the internet has an IP address, some are Public, some are Private. Almost certainly all the IP addresses in your house, behind the router will have Private IP addresses. Your ISP will dynamically allocate an IP Address to your router when it sees it’s switched-on, ready for connection. This will be from a store of addresses it has and will look something like this – 86.10.6.1 – this is effectively the equivalent of the telephone number for your house. As the number of Public IP addresses is limited, your router will then allocate an IP address to each device from a Private range and these will look something like this – 10.0.1.2. It is the job of the router to map the devices from the Private range of IP addresses to the Public IP address space of the Internet.

So you can see I hope that the Router is a really important piece of equipment as it handles all the transfers of information to and from the internet using IP addresses. If you’re using wired ethernet connections that’s really all you need to know (there’s loads more but not for this post) and as long as your hub is working and has the correct lights shining all should be well. However we have the wireless network to consider, don’t we? So now we come to “flaky WiFi”. At last, I hear you say!!

Your wireless router (or hub) broadcasts signals to devices on different channels (like TV channels). Usually when you switch it on it will configure itself to use the best available one. However, if another network nearby (say next door) is using the same channel there will be interference between the two causing the signal to be interrupted, the information to be resent, the performance to drop. This is the most common reason why you will get “flaky WiFi”. Other reasons may be that you are too far away from the wireless router to get a good signal, you’re moving about, the walls are too thick, the router is not located in the best position to cover the whole house, the wireless card in your computer is damaged in some way (or is just too old to get good performance), or your software is not configured correctly.

I can’t deal with all of these but here are a few links that you may wish to follow up these …

For the Mac user – Lost WiFi: How to fix WiFi connection problems.

A reasonably readable piece – How to troubleshoot wireless router problems.
A more complex but good explanation – How to troubleshoot a flaky internet connection.
… for now I’ll just go through a couple of situations.

1) If the signal as shown on your device gets stronger the nearer you get to the router, your problem is likely to be the siting of the router. You need to move it closer to where you wish to use the device, or consider a wired connection instead. This might sound daunting, running cables and the like, but you can buy a pair of Powerline plugs and connect the router to the device using your internal mains electric circuit. Alternatively, you could extend your network, again using Powerline technology to provide a Wireless Access Point near to where you want use your laptop, phone or tablet. [Note: There are other manufacturers and suppliers of this technology other than Trendnet and Amazon, this is just the kit I use. Furthermore {Feb 2021} the use of Mesh systems has become more common.]

2) If the WiFi is definitely “flaky”, it’s intermittent, or undependable, you’re most likely to need to change the channel. You may be able to do this yourself using the management software provided for your hub, but you may also find it better to contact your ISP, explain your problem, say that you believe you may need to change the channel and they’ll talk you through doing just that. [They may indeed be able to change it remotely.]

That’s it. I knew about channels before writing this, but not the term “flaky WiFi”. I’ve learnt something new!
screen-shot-2016-10-11-at-17-28-54PS If you want to know just how well your device, and/or network is performing why not use Speedtest, it’s available for mobile devices like phones and tablets as well from the App Store or Android Store. Here’s a screenshot of a test I just did on a wired connection in my house using Virgin Media as my ISP. It’s quite addictive.