Video-editing for Dummies

… and I am talking about myself here!

If I wanted to do video-editing and wasn’t doing “this U3A stuff”, I’d use Apple’s iMovie which is a “really nice and easy lemon squeezy” way of producing videos, but I can’t because for the Group it has to be cross-platform, and it has to be FREE!

I have suggested using YouTube for simple editing and indeed with the new YouTube Studio that may be your best solution – especially if you’re intending to share the video on YouTube through your Google Account; Google provides some Help & Assistance on how to do some basic video-editing and provides a useful help page with a short video on how to do video-editing using YouTube Studio, and there’s a load of other YouTube videos on the subject as you might expect.

However, not all of you have Google/YouTube accounts, and not all of you would want to “edit in the cloud”, so we need to find another solution that ticks all the boxes.

The one I found that does just that, and which also has a substantial amount of Help and Support documentation and video tutorials is Shotcut.

It’s a bit daunting when you first start it up; so many controls, icons, sliders, windows, options – but don’t let that put you off. Just try the basics to get started and then go back to learn more as you need it.

Here’s a link to a “Getting started …” video, and here’s one to a “manual” which tells you more about video-editing and using Shotcut. If you want to print something out to have beside you as you learn how to navigate the interface, you might find this short (3-page) guide useful.

Having created your video masterpiece you’ll want to save it in a format that is playable on most online services and applications – choose MPEG4 from the Export option – and then decide what you want to do with it. You can of course upload it to Google Photos – there’s no size limitation on videos you upload apart from the 15Gb per week that you get against your free storage limit – which is 15Gb!!!! You could use YouTube of course (see above) – but the quality of the video may be downgraded as you upload it; but I’d recommend you also look at Vimeo as it’s a more privacy-orientated platform for sharing videos and has a better-quality of video playback too. You can do quite a bit with a free subscription, but if you’re into video-production in  big way it might be worthwhile paying  £72 for an annual subscription. Alternatively, you could decide to host your own videos, on your own website – but that's for another day!

… and that's about it – except for the dreaded live-demo!

Recorded from Zoom, my first attempt. Not all the panes were showing, so I'm afraid the Timeline pane is not to be seen – it's at the bottom of the screen. I'll need to see if I can record the whole screen – not just the Window.

[PS: I've now found out how to share the Desktop, rather than just a Window, so there's no stopping me now. Next time, next time …]


Upgrading the RAM on your Laptop PC

This is all you need

The only tool you need is a Posidrive #0 screwdriver for this laptop, I bought a set of six small screwdrivers made by Black & Decker some time ago; if you’re going to do more of this sort of thing, you might need to buy a more sophisticated toolset. I also attached an earth strap – just to show you how to the job properly – but to be perfectly honest I don’t usually bother.

But I’m jumping ahead. You first have to find out what upgrades you can do to your PC. I recommend using Crucial as the supplier of both RAM and hard disk upgrades. When you land on the site, you will see a screen something like this – it will change as new products are introduced …

… you click on Select Computer (you can download a tool to scan your computer, but that shouldn’t be necessary as all the information you need is usually on the bottom of the laptop) and supply the information required about your computer …

… and the following information should come up.

I’ve selected the Upgrade I want, but I’m also offered different DRAM memory choices, as well as SDD hard disk upgrades …

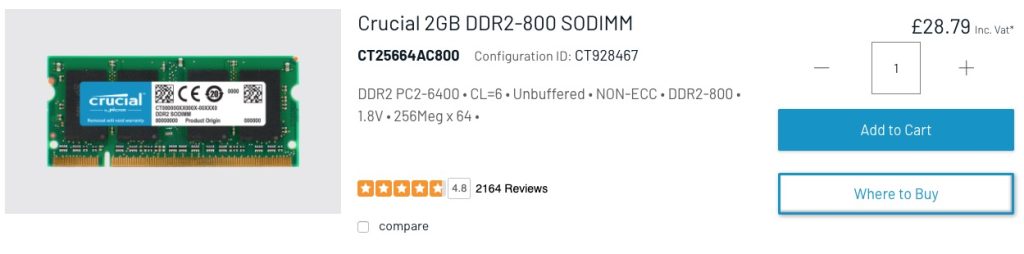
… from this I get the Part No. and then see if I can purchase it cheaper on Amazon – for old memory I usually can …

… so that’s saved £10. Now we turn to the removal of the old 1Gb DRAM module and the insertion of the new 2Gb module. Turn the laptop so that it’s back is facing upwards …

… take your screwdriver and unscrew the screws which are holding the back panel in place.

On this model the screws don’t totally come away from the panel which is great as there’s less likelihood of losing any of them. Unscrew them all, and slide the panel off …

… the DRAM is right in front of you on the left-hand side of this picture. All laptops have different layouts, but the DRAM modules are very easy to pick out! Next comes the first tricky bit (not really). You need to prise the two clips holding the module in place on either side of it. Here’s me prising one clip away …

… you have to do them together of course, but as I don’t have three hands … the module will pop out and swing upwards so that you can easily remove it, which you should do and place it on an electrically inert surface – just in case you have to put it back! You then get your new module and slip it into the space vacated by the old one at an angle. [My apologies – I should have taken a picture of this.] Most problems occur at this point as it can be tricky to insert the new module in firmly enough. You then gently push it down so that the clips re-engage with the module.

Nearly finished now. The new DRAM module is in place and you just have to replace the back panel, tighten the screws and hope that the new memory will be recognised when you boot-up the computer. You may be advised that the Memory Configuration has changed when you re-boot, just ignore this the first time you attempt to re-boot your computer. Check the memory has been recognised from the Windows System Panel …

… and you’re good to go. Any problems, first try and check the module has been inserted firmly and far enough into the slot, and then if necessary run the System Configurator when asked to when you boot up. I’ve never had to do the latter, I have had to unscrew the panel and re-insert the memory module though.

And that’s it. It took me about 10mins, but I have done it before. Still 30mins tops will see you with more memory in your old laptop and hopefully improved performance.