Recently, someone in the Cardiff u3a Lightroom Pantry group asked me this question …
Sorry to bother you, but I’m running out of hard drive space on my Mac, can I delete any of these files? I’m wondering about the previews file????
The first thing to say is that the user is storing images on an external hard disk, just the catalog and previews files etc. are on the internal hard disk. So this text from a post from a Lightroom Queen Forum is helpful …
Unless you have a laptop and or your images on an External drive, you don’t really need Smart Previews, standard Previews will grow unless you limit the number of 1:1 preview to 30 days. Deleting images does not immediately delete the previews though I think it will eventually.
If you upgrade to LrC v14.01, you also now have the option to limit the size of standard previews not exceed 100 or 150 GB or what number that you set. LrC will the delete previews beginning with the oldest and starting with the 1:1.
I have about 82,000 images in my master catalog and a standard preview size of 41GB. On import I generate minimal previews, no 1:1 and have 1:1 previews set to delete after 30 days. I have not (yet) set a limit on the size of my standard Previews.
So the user should use Smart Previews as they have an external hard disk holding their images.
They should also look at the Import parameters for Previews (in the top-hand corner of the screen) in the Import dialogue and choose Smart Previews. They should also NOT use 1:1 Previews as they take-up more room on their hard disk, and should choose Standard Previews. This is my setting box …
Finally, the user (and you maybe) should look at the Catalog Settings > Preview pane which might be a way of restricting the growth of the Preview file (as mentioned in the Lightroom Queen Forum) …
An important fact I forgot to mention (which again was mentioned in the LrQ Forum post) – you can delete the Preview file; it will just be recreated as needed (it takes a very short time to recreate a preview of an image). Limiting the size of it will certainly ensure that the disk space used will be less, and if they create 1:1 previews in the future, deleting them after 30 days (as I have it set) will ensure that disk space will be controlled too.
Another member challenged me on why (see Import settings above), I chose to Make a Second Copy of images when I import. My response …
It’s a timing issue. I don’t keep SD cards with images on them – I know some of you do. I Format the cards in Camera (not on the computer) almost immediately after I’ve imported. [That stops the rather annoying feature of images you’ve previously deleted in LrC being suggested for Import when Import All is selected in the dialogue.] So … I need a belts and braces facility in place, just-in-case, my internal hard disk crashes before Time Machine has backed-up my current year images. So I do a Second Copy to my iCloud drive, which I delete periodically, usually at the same time as I delete old backups of catalogs which are also held on the iCloud drive.
Next we turn to the range of tasks that I do every year at this time – as the year ends and a new year begins.
The first thing to state (and a very obvious one at that) is Backup your Catalog, and then continue to Backup your Catalog as you try some of these ideas out. That will mean exiting Lightroom Classic and NOT skipping Backup. It’s better to be safe than sorry!!!
So what might you wish to do when Importing images into your catalog?
Two things really, first creating a “preset” for the Metadata that you’d like to import with every image which will then be baked into the EXIF data of the image. The second is the Preset itself which records the action that you wish to take on each Import eg where the images will be stored, in what form, renaming them, making a second-copy, profile changes, etc etc.
Let’s look at each in turn.
You want to add to the Metadata added to the image at the time of import, to add keywords, or to add a Copyright notice. This can be done from the Metadata pull-down menu in the right-hand Import panel …
Screenshot
… and here you have a whole range of options that you can choose from with perhaps the most relevant being the Copyright info. and any info about you you want added …
Screenshot
… so my Copyright info, and the only ones I use in the Metadata, and which I update each year before January 1st looks like this …
Screenshot
… and that’s about it. I enter MLT Copyright 2025 in the Metadata field in the right-hand pane and move to the next step – creating an Import Preset.
Click on the Import tab in the Library module; apart from deciding whether you want to …
NB I almost always choose Copy
… you will see at the bottom of the screen the word None …
You click on “None” to see the range of Presets you can deploy
… unfortunately, this will always be the case; it’s up to you to now create, and then choose the Import Preset you want to use. This has its advantages because you can change the one you want to use by year, by camera, by anything.
So, you set up the parameters from the right-hand pane the way you want them and then click on None and …
Screenshot
… Save Current Settings as a New Preset, and you’ll be asked to give it a name, and that’s it. Every time you want to apply these parameters to an Import, that’s what will happen. The files may be renamed (if that’s your wish), they will be copied to a specific folder on your hard disk, etc etc.
Other tasks to do at year end.
Search for missing files (these will be photos in the catalog, but not in folders -they’ve probably moved!)
Searching for duplicates – The Lightroom Queen has an excellent post on this topic which I can’t improve upon and recommends a plugin (which I have used) which in the case of simple duplicates works well.
For more complicated duplicate problems – perhaps involving whole folders of potential duplicates, its probably far better to use an operating system program such as dupeGuru (MacOS and Windows) or Photosweeper (MacOS) – there are others for Windows that I haven’t tried. I’ve tried both but prefer dupeGuru as it allows you to do a quick sweep by EXIF data, and Content of Pictures specifically.
One suggestion I have is to separate folders into catalogs and Export as Catalog before doing any scans for duplicates. When you have a folder that you think is clear of duplicates chose Import as Catalog from the Library > File menu, and when this has been achieved, delete the original folder.
This links to another feature that I rally hadn’t appreciated until I read this article. Rather than doing move of files/folders INSIDE Lightroom (which is the accepted wisdom to maintain the integrity of the catalog) – which can take a really long time and which is also potentially dangerous in terms of file corruption, use Find missing folder. You chose the old folder in the Library and then point (by right-clicking) to the new folder you’ve just imported.
Backup
All of the above was a preface to doing the real annual task which is creating an offsite backup which up until this year was copying all the images and the catalogs onto a hard disk that I stored in my son’s house nearby. This was the safe/secure disaster recovery option which meant that all my historic images would be safe.
In doing this work, this year, I realised that I’d probably not been as clever as I could have been, and in copying images and catalog(s) separately, I’d been missing a trick. It became obvious to me (light-bulb moment) that I should Export as Catalog (Catalog + Images) to the Hard Disk. This then led to the realisation (second light-bulb moment) that I was keeping a large number of old catalogs, for previous versions of Lightroom that I would never go back to, because if I stopped my Photographic Plan subscription I would still have access to the Library module. Why would I want to go back to an earlier version!
I was on a roll now and looked at other people’s backup strategy. Yes, I was doing the right thing in having a 3-2-1 approach – three backups, two locations, one offsite, but was I really doing the most efficient and most effective form of backing-up. Perhaps (third light-bulb moment) it might be better to clone my Lightroom folder(s) overnight – so that I could quickly recover in the case of primary internal hard disk loss – instead of relying on rebuilding from Time Machine and iCloud Drive; and perhaps it might be better to look at Cloud storage for the offsite storage.
I’m moving closer to making a decision on this and if I do move in this direction I will probably use Carbon Copy Cloner (MacOS only) for cloning to a local hard disk, and Backblaze for offsite storage to the cloud, run overnight.
I’ll report on how I get on with this at a later date.
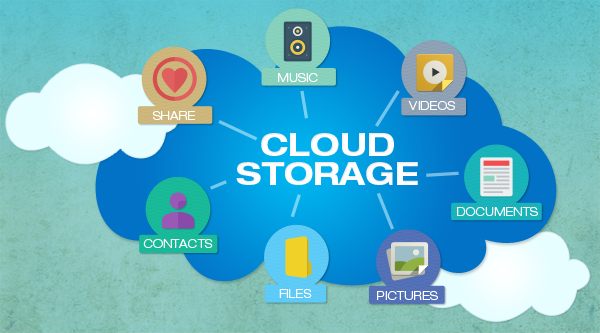
Attending my first meeting of the Cardiff University of the Third Age (U3A) Computer Group, I offered to write some notes to accompany the talk that was given on Data Storage in the Cloud by David Reeves. So here goes …
Computing has moved a long way from the days when all you stored on your computer were words and numbers. Gradually this has been extended to include first pictures, then audio, and then video. With the addition of these media so the requirements for memory to store them increased first by needing an increase in the Random Access Memory (RAM) that the computer had so that you could actually view or listen to the media, and then in the disk storage you needed to hold and recall the images or music at a later date.
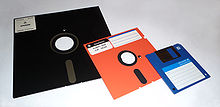
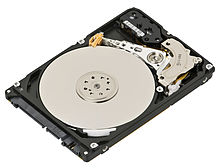
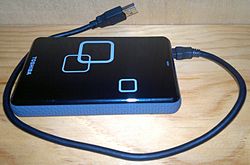
This need for additional storage meant first the introduction of floppy disks, then hard disks inside the computer, then external hard disks connected usually to a USB port on your computer and then flash drives which you could carry around with you and then connect to a USB port on your computer.
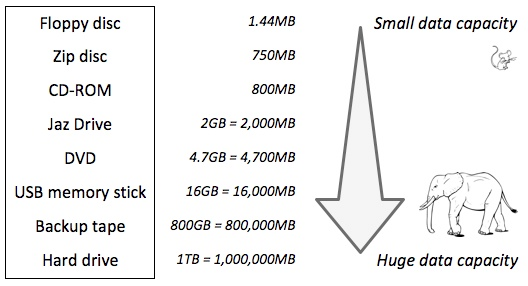
With the changes in technology, so the amounts of information stored by each device increased. To give you an idea of how much this has changed you might like to look at the table below – which is actually out of date because you can now get both USB Memory Sticks and Hard Drives considerable larger than those quoted here.
If you want to read more about Information Storage including some technologies I’ve not discussed here such as CD/DVDs you could follow this link or this one, but there’s far more information in these articles than you need to understand why it might be a good idea to store information away from your computer – in the cloud.
Before we do that it might be a good idea to raise an issue that storing all this data causes – what happens if the device breaks, gets corrupted in some way, or just simply gets lost! Now, computer professionals have always done back-ups of their stored data (or they should have done), but the home computer user has never really put a value on their data UNTIL they lose it. So backing-up your data (stored information – words, numbers, images, music and videos) is actually an ESSENTIAL part of owning a computer. This article describes the various ways you might consider backing-up your data but at the bottom of the list is Cloud Storage and that’s where I’m going to take you now.
Wouldn’t it be great if every time you saved a picture, word processed document, spreadsheet … whatever, a copy was automatically made and stored away from your computer so whatever might happen to your computer, the most important part of it – the information it stored – was safe. That’s the essential value of Cloud Storage and the most important reason for using it. We’ll turn to the second most important reason – sharing information with others – later.
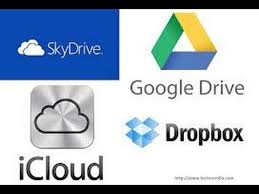
There are a number of Cloud Storage options you can use for free as long as you keep your storage below a certain limit. You can use as many as you want to and you might consider using different providers for different purposes. For instance I use Google Drive mainly for Photo Storage, Apple’s iCloud for documents, and Dropbox for sharing stuff. [I’ll maybe explain why I do this in another post.] The other main provider is Microsoft with their OneDrive (formerly SkyDrive) offering, I don’t tend to use this much, but the principles for using it are much the same as the others.
So how do you use them? As I said above, the principles for each are much the same. I will use Google as the main example, and provide links to the others as well.
Google Drive. You will need a Google Account. This is a good idea in any case as it allows you to create another eMail account – I’m a strong advocate for having more than one eMail address anyway (see Point 3 in this post). Go to Google Accounts to setup your Google ID – you can use your existing eMail address if you want to. Then with your account set up you can go to this page. I would suggest you download the applications for your desktop as well as setting it up for your browser. Installing the application on your Windows PC, or your Apple Mac, will then create a Folder in which you can store information and which then will then be backed-up to your Google Drive “in the cloud”. Voila – you have peace of mind that your precious information has been saved. Any changes you make to the information will be synchronised with the version saved on your cloud storage.
For Dropbox go to this link and create your account, perhaps using the Google email address you’ve just created above – a lot of services allow you to link to your Google ID and this means you don’t have to remember lots of IDs and Passwords.
If you’re an Apple user (iMac, MacBook, iPhone, iPad, etc) it makes sense to use iCloud. Even if you’re not, you can still add an iCloud Drive to your desktop and access the 5Gb of free storage you’re provided with “in the cloud”.
If you’re a Microsoft (Windows and Office) user it makes sense to use OneDrive. Like iCloud you get 5Gb of free storage from this link. You may also find that you are offered the option of installing OneDrive when you install Microsoft Office (or Office 365).
Finally sharing information with others. I don’t think I can improve on David’s demonstration and on this YouTube video …
I’ve focussed on using a Folder on your desktop/laptop machine to backup or synchronise files to your Cloud Storage. Remember also that David demonstrated how you can Upload a file using your web browser (I would recommend using Google Chrome) from your desktop to your Cloud Storage.